Some examples of Games
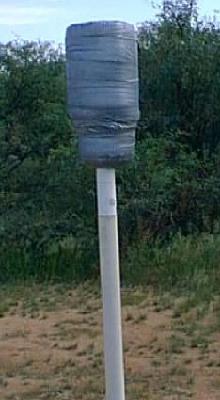
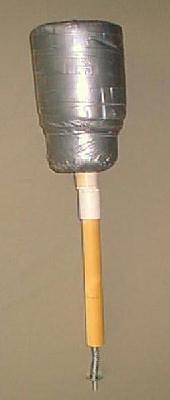
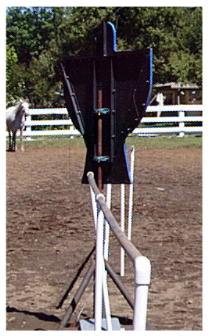
Heads Design By Lord Jacques KEO Atenveldt

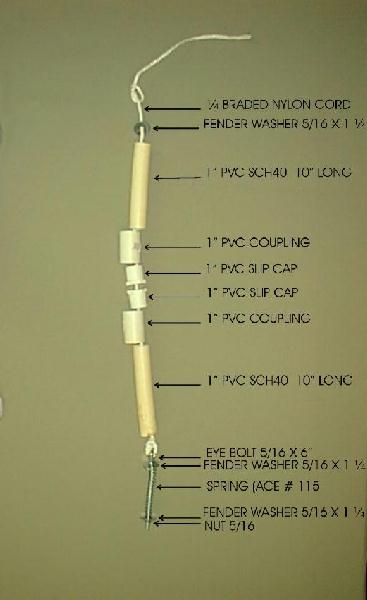
Parts:
2. 1" PVC SCH40 pipe 10" long
2. 1" PVC couplings
2. 1" PVC slip caps
3. 5/16 X 1 1/4 fender washers
1. 5/16 X 6" eye bolt
1. 5/16 nut
1. spring (ace # 115) or equivalent
2 ft 1/4" nylon braided cord
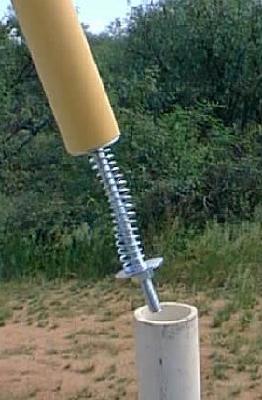
Note: This design requires that the poles used to hold the heads is made of 1 1/4 PVC pipe. This allows the heads to be slid into the poles.
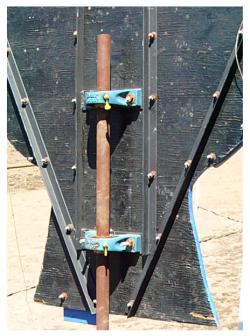
1. Start by hammering the eye of the bolt into an oval so it will slide into the 1" pipe.
2. Thread a washer onto the bolt followed by the spring then another washer. Screw the nut onto the bolt about 3/4 of an inch.
3. Drill a 3/8" hole in the top center of the slip caps. Remove any burrs and sharp edges from the hole. This is the main point of wear for the cord.
4. Attach each coupling to a pipe and slip cap. Glue is not needed.
5. Thread the cord through one of the slip caps and pipe. Attach the cord to the eye of the bolt. Slide the bolt into the pipe.
6. Thread the free end of the cord into the other slip cap and pipe. Thread a washer onto the cord.
7. Pull cord tight plus about 1 1/2" of the bolt into the pipe and tie a knot in the end of the cord to hold it all together.
8. Attach whatever kind of head material you want to the top portion of the pipe. (the knotted end)
9. To adjust the tension, simply turn the nut on the bottom of the head.
Now for a simple alternative.
This was my first design.
Replace the eyebolt, spring, and nylon cord with a bungee cord instead. You will have to replace the bungee cord at least yearly because it will lose its tension over time.
Quintain built by Lord Ivan and Eorl Sir Edward Ean Anderson
and significantly modified by The Honorable Togrul Guiscard

These three pictures show the back of the quintain constructed by Lord Ivan and Eorl Sir Edward Ean Anderson in 1993 and then substantially modified by the Honorable Togrul Guiscard, in 1997. This quintain was built in a similar fashion to one in CAID. When Togrul rebuilt it he placed pillow bearings on it to make it turn more freely and remade the top with two shields to allow left-handed riders or those who cannot hold a lance right-handed a chance to play. He also installed an electric counter to make it easier for the ground crew to keep track of turns. A typical hit at the canter brings 15-20 turns. A tilt constructed of dowels, pvc pipe and connectors and held up by fiberglass electric fence posts is set up to "encourage" green horses to run straight through. Many of the folks in our area have young horses still in training and a breakaway tilt of this nature is a significant advantage to them in training their mounts.
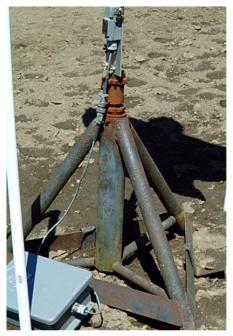
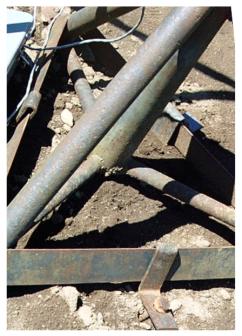
These two pictures show the base of the quintain and the clips we use to hold it to the ground. The tripod base is constructed of 2 inch pipe and angle irons. The clips are folded out of metal about one-eighth inch thick and 2 inches wide. The stakes we use are constructed of one-half inch rebar about two feet long with a large nut welded to the "hitting" end.
Ring poles by Madonna Contessa Ilaria
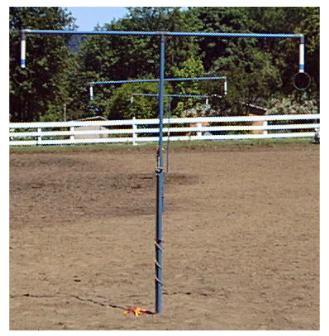
My ring poles are constructed of closet-rod doweling amd plumbing parts. I used T's for the intersection of the cross piece and upright, and elbows for the drops. The rings are held with flat magnets. Over the years I have tried clips, velcro and an assortment of other "hangers" for the rings and the magnets are the best I've found. Take your largest ring to the hardware store and try out the magnets to make sure that they are strong enough. Cow stomach magnets work well if you can find the square ones. Cylindrical ones allow the rings to turn too much. I use metal fence posts to hold the poles up. I have rarely seen a horse crash into a ring pole although they routinely crash the saracens heads. I think this is the rider's "steering" rather than the horses fault. If you are concerned about crashes, I would recommend the fiberglass electric fence posts as they are flexible and as safe as anything can be around horses.
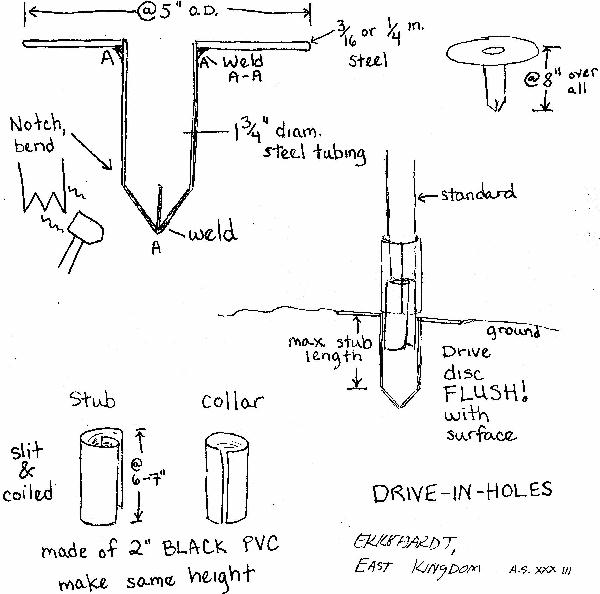
Ekkhardt of Oakenwode's drive in holes.
In Use:
Drive "hole" so that top of disc is at/below surface. If possible make the disc of diamond plate (less slippage).
The stub MUST be short enough to slide down into hole leaving flush top. Make a hook for pulling them back up.
Do NOT tape collar. It's supposed to be a snap fit, so that the standard will pop out. Otherwise the safety aspects of this system don't work.
If run over (test yours!):
1) standard falls/knocks away.
2) collar usually stays on standard.
3) 'stub', if stepped or landed on will slip down into hole, leaving a flat surface with no projections.
Bring a few extra stubs and collars to events!
disclaimer:
I made these; I use these. We've had no problems with them. But it's a funny world. Test your version and make your own decision!!
No patent, no copyright, feel free to distribute.
Ekkehardt,
East Kingdom
Building games equipment
General information:
I have found that my lances need to be repainted and taped every year if they are left outside much, but I haven't had one break in 5 years. I have had one boffer sword break, but I think it got stepped on. Otherwise they need to be retaped as the duct tape dries out, but don't require much else.
Lances:
Counter weights
I use plumbing parts for counter weights on lances. Black iron end caps come in various sizes and are heavy enough to make nice counterweights.
I have also used cow horn weights, lead solder and most anything else I could think of to make the weight.
Connector sleeves
I have used 1.25 diameter sink out flow extenders(more plumbing parts), vacuum cleaner pipes, both metal and plastic, (I prefer the aluminum ones), torchiere or floor lamp tubes, and most anything else that is reasonably light weight, strong and cheap.
Vamplates
you can construct one of leather or metal, or you can use any one of a number of found objects. Conical plastic coffee filter holders, aluminum or steel shades off of swing arm lamps, funnels and any other conical thing of the right size can be pressed into service.
Ring Lance
decide how long you want it to be, measure the pool cue and buy a dowel that makes up the difference.
materials needed:
1 old pool cue
1 dowel 4-6 feet long 1 5/16" diameter
counter weight
connector sleeve
epoxy glue
sandpaper
paint
contrasting electrical tape
Remove counterweight from wide end of pool cue if it has one.
Glue connector sleeve to the end of cue. Glue dowel into connector sleeve. Glue counterweight to end of dowel.
When glue has set, remove excess and sand.
Paint the lance. Spiral wrap with colored electrical tape to decorate.
If you live in a kingdom where the rules state that your lance cannot taper more than two feet from the end, look for a 2 foot tapered table leg at the hardware store instead of the pool cue. Proceed as before except you will need a longer dowel.
Quintain Lance
materials:
one dowel 8+ feet long
counter weight
rubber chair tip
epoxy glue
paint
contrasting electrical tape
Decide how long you want your lance to be and buy a dowel that length. I have been using closet rod doweling (1 5/16")for several years now, and as long as you purchase clear ones with completely straight grain, they will last. If the grain runs off the dowel that is a weak point and it might break there.
Some kingdoms require 1.5 diameter material or hardwoods. Check your local regulations.
Glue a counterweight on one end and place a rubber chair tip on the other.
Paint
Spiral wrap with colored electrical tape to decorate
A less expensive lance can be made by cutting the corners off of a 2x2 to make it octagonal in cross section. These also work well and if made of straight grained wood will last. I use a rubber carpet protector glued to the striking end of mine.
Whalebone (boffer) Sword
Heavy wall 3/4" PVC Pipe 3 feet long
3 feet foam pipe wrap, minus 6"
duct tape
put pipe wrap on pipe, and tape with duct tape. Do NOT put a lanyard on your equestrian arms, it is dangerous if you fall.
"Boffer Mace
closed cell foam
hot glue or contact cement
heavy wall 3/4"PVC pipe 24-36" long
duct tape
Cut closed cell foam into 4 equal triangles, 4x4x6". Glue the 6 inch edges to one end of the PVC pipe, to form flanges. Duct tape the whole thing. Do NOT put a lanyard on your equestrian arms, it is dangerous if you fall.
This page is under construction.
More games and equipment coming soon.
| Home |
| Email me |
| Top of Page |
| an interesting page on games equipment |